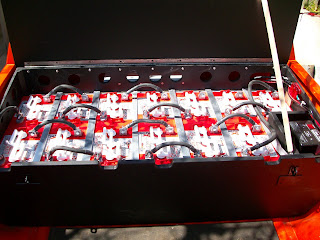
The batteries finally arrived! and we secured them all (the ones that will live in the bed) down and cabled them!
[Don't forget that you can still, always, click an image for a larger view]
.JPG)
Look how professionally we made those cables!(with a hammer crimper and some glue-heat-shrink)

A few of the taillights had corrosion so we had to do a little surgery to get to the "root of the issue"

The root of the issue! (the silver contacts)

The mounted, repaired tail-lights.
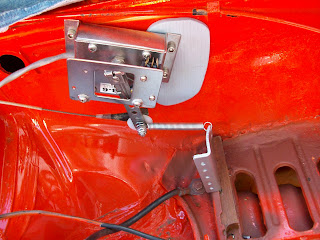
The "pot box" which will translate how hard I step on the "gas" to the controller(which is now also mounted but I don't have a pic of it yet.)
This picture is a poor representation of reality, but it shows the passenger door latch. I felt it deserved a photo because I feel like aligning this door was a significant accomplishment. I am proud that it now latches like soft butter (not the sledgehammer it used to be!)

This is the (from R to L) vacuum reservoir, brake fluid and vacuum pump[the black in the background is the original vacuum booster]. These are going to create pressure for my brakes which used to be run by a vacuum in the old ICE (Internal Combustion Engine).
.JPG) Remember this old thing? This is what it looked like when we pushed it into my parents driveway after pulling out the engine at my house.
Remember this old thing? This is what it looked like when we pushed it into my parents driveway after pulling out the engine at my house. The orange machine itself!
.JPG) A look inside, looking pretty sweet.
A look inside, looking pretty sweet..JPG) The bonnet on and adjusted (adjusting was a bit of a pain in the arse)
The bonnet on and adjusted (adjusting was a bit of a pain in the arse).JPG) Under the bonnet, the other half of the power! (underneath these badboys is the transmission and the motor [&misc. yada-yada])
Under the bonnet, the other half of the power! (underneath these badboys is the transmission and the motor [&misc. yada-yada]).JPG) This stuff is under the batteries [this is an old photo, remember it?]
This stuff is under the batteries [this is an old photo, remember it?]
.JPG)


