Web Page Counter

Saturday, August 8, 2009


Remember this old thing? This is what it looked like when we pushed it into my parents driveway after pulling out the engine at my house.


Now look what's happened...


The orange machine itself!


A look inside, looking pretty sweet.


The bonnet on and adjusted (adjusting was a bit of a pain in the arse)


Under the bonnet, the other half of the power! (underneath these badboys is the transmission and the motor [&misc. yada-yada])


This stuff is under the batteries [this is an old photo, remember it?]

Sunday, April 5, 2009

Batteries! Cabling!

The batteries finally arrived! and we secured them all (the ones that will live in the bed) down and cabled them!

[Don't forget that you can still, always, click an image for a larger view]


Look how professionally we made those cables!(with a hammer crimper and some glue-heat-shrink)
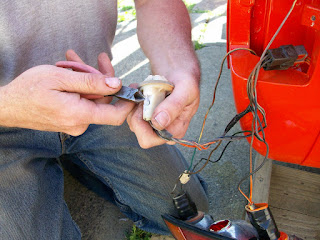

A few of the taillights had corrosion so we had to do a little surgery to get to the "root of the issue"


The root of the issue! (the silver contacts)


The mounted, repaired tail-lights.


The "pot box" which will translate how hard I step on the "gas" to the controller(which is now also mounted but I don't have a pic of it yet.)


This picture is a poor representation of reality, but it shows the passenger door latch. I felt it deserved a photo because I feel like aligning this door was a significant accomplishment. I am proud that it now latches like soft butter (not the sledgehammer it used to be!)


This is the (from R to L) vacuum reservoir, brake fluid and vacuum pump[the black in the background is the original vacuum booster]. These are going to create pressure for my brakes which used to be run by a vacuum in the old ICE (Internal Combustion Engine).

Saturday, February 14, 2009

Interior and battery(box) info

This is the battery box which will go in the bed. Made entirely by Brian (many thanks.)

This is a custom indent we made because of where the gas tank fit, in the trucks previous incarnation as a gas guzzler.

This is a closeup of the required vent holes so there will be no buildup of gas released by the batteries as they nestle together in thier freshly made home... or later on...

The door panels are on... mostly (they require a little fine tuning still)

We got the carpeting in-- as well as the seats (that was not easy)

Windshield!

The dashboard is in too.

Bumper cover: ON! [BAM!!]

This shows where the 2# cables will enter and exit on their pathway to and from the rear batteries. Also shown are the mounting holes for the aforementioned battery box.

This is the latest update from yours truly: VeryBusySveltron!
Note that Valentines day has been spent working on the car and informing its followers.

the (unlikely) projected finish date is Feb. 24th [My birthday.]
Over and out.

Tuesday, January 13, 2009

The beginning of re-assembly! wow! gosh! Gasp!


The front: protected by a blue-jean custom-made cover!


See the motor(blue), the transmission (metallicdirty), and the attached drive-shafts(next to motor/ black)!


This is the "before" picture for a (hopefully) soon-following "after" picture with a homemade headliner, and either bought or created door panels.


Notice the doors are on!


Had to give you all angles...

Tuesday, January 6, 2009

A trip!

So, after several days of spraying, turns out that the water-based paint we were spraying runs if it hasn't dried and the morning dew comes. We decided to get it professionally painted.
since it is so thouroghly gutted, we had to put a foldable chair inside to get it down the driveway.
it seems it was a miracle everything got there safe and sound the way we loaded it...

Airbrushing!!!


This is how we all felt when the airbrush broke because of improper cleaning...

This is a couple days later after we fixed it!

more masking


more masking!

and masking!

Thursday, November 13, 2008

Masking!

Can you believe how long it's taken just to get the car ready to paint[16 weeks]? I bet you're beginning to wonder if you'll ever get to see somebody converting a gas-guzzler into an elctricity guzzler! But don't worry! I feel exactly the same way: you're not alone.


But anyway! The other day we got really into masking so it looks all cool and retro! Brian wants to get lime green tires. I think not.

Thursday, November 6, 2008

DMV victory

I finally got my name on the registration, and a temporary op. permit that lasts until the end of the year! I win! Finally! And I only had to go to the Novato DMV once (where they actually know how to do their jobs!)

We are all primered and ready to get a-painting.

I purchased a black hard-rubber restorative for the wheel-well covers and bumpers and guards (and other whatnot that is rubber and black) so everything will look nice once we put it all back together again. [not like humpty-dumpty]

as always, things are continuing-- slowly but surely.

Monday, October 13, 2008

Things ARE getting done.

Firstly, I apologize for anyone who has noticed my posting negligence... there has been a lot of tedious hard work being done and it doesn't particularly look like anything is getting done... but here I go anyhow:


This is what block sanding looks like...


This is what serious feathering looks like when there are a couple extra layers...


This is what a ceiling should look like!


This is what Maureen looks like after she feels like she's acomplished something!


This is what she accomplished!!
Notice that the floor is particualrly clean and the extrraneous wires behind the dash are gone.

Legitamate work is getting done here, we are close to... (dare I say it??) painting time... dun dun dun.

We took the insulation off the ceiling and found another enemy! To be Fixed!!

More Por-15 evidence!

Thursday, September 25, 2008

Primer, De-rusting, Sanding


Daniel doing some rust preventing...

Brian cutting out some rust...

Robin stripping the bonnet...

Maureen and Robin looking cute, sanding and stripping...

The bed: all primered!!!

Tuesday, September 16, 2008

Photos!


The bed all stripped (the second time) and ready for a good primer-in'

Here the paint was full of flaws and was crackling, so I stripped it!

This is the filler we were using on the tailgate (the one where we learned a lot) ...doesn't it look like toothpaste?

This is all the paint. Doesn't look like much, does it?.   Should go a long way.